If you are a mum who is struggling with postpartum back pain or lower back pain after pregnancy then these postpartum back pain exercises are just what you need!
One of the most common reasons given by our customers for seeking out MUTU System in the first place is back pain.
88% of those that we asked have experienced back pain since having their babies and 64% said back pain has a big impact on their day to day life.
You need to know that you do not have to put up with pain just because you had a baby.
Many mums also contact us experiencing back pain after a c-section or long term back pain after a c-section. Again please know that you’re not alone and that this is not an inevitability that you must simply endure!
So what can we do to try and regain comfort and strength?
We’ ve pulled together a selection of our best postpartum exercises for back pain (14 in total!) that will help you get relief and regain comfort. We will also cover some ways that you can incorporate these exercises into your daily routine.
It is important to start slowly and gradually increase the intensity of your workouts as you get stronger. If you experience any pain, stop immediately.
Postpartum exercises for back pain
There are plenty of great exercises out there that can help, we have rounded up a selection of our favourite exercises to relieve back pain after giving birth.
1. Front to Back Opener
*For this exercise you will need a strap, band, towel, or something similar.
Stand comfortably with feet hip-distance apart, holding the band in both hands with slight tension in the band.
Exhale and slowly lift your arms, feeling the movement coming from your shoulders and feeling the stretch in your upper back. Keep your rib cage down, do not let it lift as you raise your arms.
Lift your arms until they are over your head
Continue the stretch by lowering your arms and the band behind your back as far as you can comfortably go
When you reach your range of motion bring the band back forward, above your head, and then lower back down to starting position. Repeat for 5 total reps
2. Twisting Cat
Get into a kneeling position on your hands and knees
Exhale and slide your right arm underneath your left arm with your palm facing up
Let your right shoulder come to the mat and rest your right ear and cheek to the ground
Stay in this position for two full breaths
Come back to starting position on hands and knees
Repeat on each side 2 times

3. Supported Forward Bend
*For this exercise you will need a chair or a wall to lean forward against
Stand behind a chair with feet in a comfortable position
Lean forward from your waist until your arms rest on the top of the chair
Keep a slight bend in your knees, and your ribs anchored (don’t let them lift)
Stay in this position for a few breaths, feeling the stretch in your shoulders and upper back. Lower deeper into the stretch if that feels good for you, or simply hold that position as you breathe mindfully.
4. Knee to Chest Release
This can be done standing or laying on the floor
Pick your starting position
Exhale as you slowly bring one knee up towards your chest
Hold for a few breaths, feeling the stretch in your hips and lower back
Inhale as you lower that leg back down
Repeat on your other side
Alternate knees for a total of 8 reps, 4 on each side.
5. Side to Side Bend
*For this exercise you will need a strap, band, towel, or something similar.
Stand comfortably with feet hip-distance apart holding the band in both hands with slight tension in the band.
Exhale and slowly lift your arms above your head. Keep your rib cage down, do not let it lift as you raise your arms.
On your next exhale lower to the right, feeling the movement in your obliques and the stretch in your back.
Hold for 2 breaths
Inhale and return to starting position
Exhale and lower to the left now, holding for 2 breaths
Repeat for a total of 8 reps, 4 on each side.

6. Elevator Lifts
You can’t ignore the pelvic floor muscles! It might not seem like your back and pelvic floor are connected but they absolutely are! Reconnect to your pelvic floor with this exercise:
7. Glute Activation
Getting your glutes to fire properly is so important. This exercise will help you wake up those glutes and get them doing their job – helping support the loads placed on your body! Often times the back takes the pressure when other parts of the body (like glutes) are not optimally working.
Try these glute activation exercises:
8. Cat-cow pose
Start on your hands and knees, with your back straight.
As you inhale, arch your back and look up towards the ceiling.
As you exhale, round your back and tuck your chin towards your chest.
Repeat 10 times.
9. Pelvic tilts
Lie on your back with your knees bent and feet flat on the floor. Place your hands on your lower abdomen.
As you inhale, tilt your pelvis up towards the ceiling. As you exhale, tilt your pelvis back down towards the floor.
Repeat 10 times.
10. Wall Sit
Stand with your back against a wall and your feet hip-width apart. Slide down the wall until your knees are bent at a 90-degree angle.
Hold for 30 seconds.
11. Wall slides
Mobility exercises like these wall slides are great for improving upper back pain.
Sit comfortably with your back against a wall
Lift your arms, elbows bent to 90 degrees, out to both sides
Exhale as you slowly start to glide your arms up on the wall
Only extend your arms as far as you can without your rib cage lifting.
As soon as you reach the end of your range of motion, inhale and slowly lower back down
Repeat for 5 reps.
12. Windmills
Lie on the floor on your side with both arms extended straight out, stacked with palms together at shoulder height.
Straighten your bottom leg and keep your top leg bent at a 90 degree angle (if needed place a block or pillow under bent knee)
Exhale and slowly lift your top arm and rotate it away from you, opening up your chest to the ceiling and rotating until you can rest that lifted arm to the other side if possible (if not just rotate and extend as far as you can comfortably)
Inhale and hold for 3 seconds
Exhale as you slowly rotate to bring your arm back to the starting position
Repeat on one side for 5 reps. Switch and to other side for another 5 reps
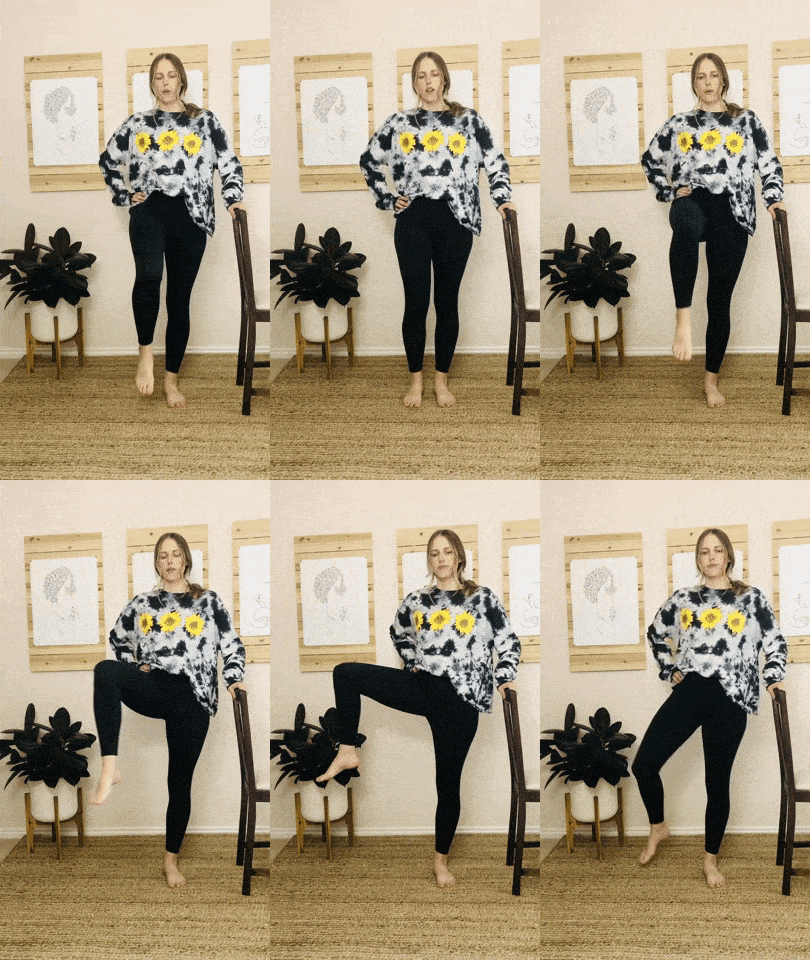
13. Hip Mobility
This hip mobility exercise is brilliant for improving lower back pain.
Stand comfortably with feet about shoulder width apart
If needed hold a chair or place hand on wall for balance support
Inhale as you slowly lift one knee up towards the chest
Exhale as you open that knee out to the side and circle it around and lower back to the starting position.
Repeat on one side for 5 reps. Switch and to other side.
How to incorporate these postpartum exercises for back pain into your routine
These postpartum exercises for back pain are ideal to add into your daily routine.
Incorporate them in a way that works best for you. The more consistently you do them, the more relief from your back pain you will feel.
Here are some ideas:
- Do all of them in a row for a 10-15 minute stretch routine, find a time of day that is best for you
- Pick one to do in the morning to help you wake up and one in the evening to wind down before bed
- Do a few after feeding your baby to give your back some TLC (feeding positions are a culprit for back pain!)
- If you have other kiddos make a family ‘stretch’ time, great for an afternoon boost. It will feel good for everyone!
The role of posture in relieving lower pack pain (without medication)
Too many of us suffer with lower back pain, chronic back pain or postural back pain. Anti-inflammatories are commonly used, but how else can we relieve lower back pain without medication?
First, we really can’t talk about back pain without talking posture and alignment. The way we sit, stand and walk directly affects the ability of our core muscles and spine to support us without pain.
Bonus Position/Exercise: Try the Buttafly
Whether you are sitting to work, watch TV, play with your kids or meditating, holding this position is not always easy. Tensions show up in other parts of the body and we can’t stay there for long. Many people avoid floor-based core exercise, yoga or meditation because they simply can’t get comfortable sitting on the floor.
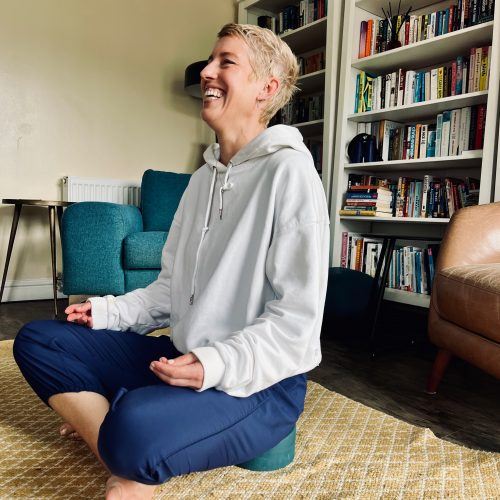
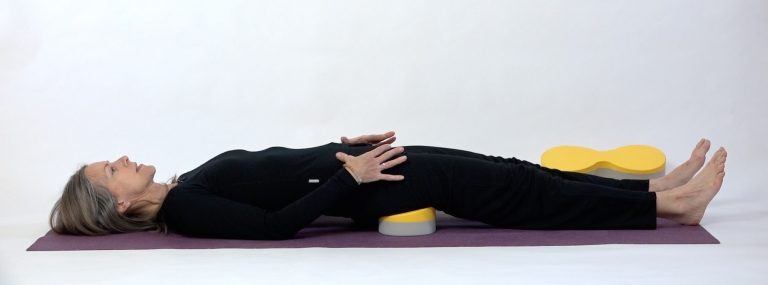
Meet one of my favourite places to sit, the Buttafly!
The Buttafly can ease discomforts from Sacroiliac (SI) Pain to all manner of chronic or postural lower back pain.
I recommend the standard size for general use and alleviation from back pain.
Experiencing lower back pain? Try this.
Just sitting your butt on this little sloping block is unbelievably comfortable and it instantly supports your spine in correct posture, removing all strain and tension. You can finally sit on the floor in comfort! I use it to practice my MUTU Breath and the sitting exercises of the MUTU System programme for core and pelvic floor health.
When sitting we know we should have a “straight” spine. This means that each bone of the spine (vertebrae) is stacked on top of the next, with the joints between them well-aligned. This will lead to a spine free of kinks and collapse, whether in a lying or sitting position. The better the posture, the less stress there is on the joints, ligaments, muscles, and tendons.
Lie on the floor with the Buttafly placed under your bottom where your butt cheeks meet the top of your legs. Stay there for at least 5 minutes and feel the release. You honestly won’t want to get up!
The base of your spine is free of any direct pressure so that it is free to release itself from stress and torsion.
You got this mama!
It can be hard to show up and be present in your day when you are in pain. Don’t settle for just making it through the day, there is so much you can do to kick postpartum back pain to the curb for good!
Does the MUTU system include exercises for relief from back pain?
It absolutely does! The MUTU system is for any birthing body, no matter if you are expecting your first baby or your babies are well grown. This is because it’s designed on a foundation of functional movement and realignment.
The seven human functional movements are: squat, bend, lunge, core, push, pull, and cyclical movements. Each of these are built into MUTU workouts and each play a role in lessening back pain after having a baby.
MUTU combines these with a holistic approach to healing postpartum back pain. That means you’ll get guidance on healing diastasis recti and pelvic floor issues, which often cause back pain. It also means learning how to properly engage your core, include breath work into your workouts, and have better posture — all important for easing back pain.
